WordPress can be a powerful, flexible platform, and there are many little tricks that can be used to extend it's capabilities well beyond what you might expect. In this post, I am going to share how we use WordPress to manage social media content.
When a customer wants us to manage their social media content, posting updates on their behalf, the process of creating the posts, submitting the posts for approval, receiving edits, and loading them into a platform such as Hootsuite can be tedious, often involving a lot of forwarding of emails with attachments. Sometimes it's challenging to determine which attachment is the most current, if it's been approved by all of the respective parties, etc.
Obviously, this is error-prone, inefficient, and just plain ugly.
Now, before you bite my head off and start trying to tell me about all of the great tools out there that might make this easier, there are a few advantages to the process I am about to describe.
- The customer already has the Website. ( btw, this process can work with just about any CMS )
- The customer already has a login. ( never underestimate the value of limiting the number of logins a customer needs to manage )
- The customer is already familiar with WordPress ( or whatever they are currently using ).
- WordPress has a decent editorial workflow. ( Drafts, Pending Review, Revisions, etc )
So, for us, it makes a lot of sense to leverage the tools our customers already have, use, and are comfortable with.
The Basic Idea
The ideas here are applicable to most CMS platforms, it just so happens for a majority of our marketing customers, WordPress is already in place. What we want to do is generate an RSS feed that will be picked up by Hootsuite ( or whatever platform you like, provided it supports pulling RSS feeds ).
- We create a custom post type that we load up with the social media content, setting each post as a draft. Optionally, we can set a post date to some optimal time for the post to be picked up.
- The customer logs in, edits the post, and when satisfied, publishes the post.
- We connect the RSS feed to Hootsuite, and assign it to a social media network.
- Magic happens!
As you can see, overall, this is a very basic workflow, but it can take a lot of the pain out of managing a customer's social media content.
Custom Post Type
For our setup, we make a really simple custom post type. If you are not familiar with custom post types, I encourage you to read up on it in the WordPress Codex. If you are not using custom post types, you are likely missing a lot of opportunities to make much better WordPress sites.
There are many ways to create a custom post type in WordPress, a simple code snippet in your theme's function.php file is the most straightforward way and will likely be sufficient for our purposes, though it is recommended to create your post types as a plugin. You could use something like this:
<?php
     add_action( 'init', 'create_post_type' );
     function create_post_type() {
          register_post_type( 'social_media',
               array(
                    'labels' => array(
                    'name' => __( 'Social Media' ),
                    'singular_name' => __( 'Social Media' )
               ),
               'public' => false,
               'has_archive' => false,
               'rewrite' => array('slug' => 'social-media'),
               )
          );
     }
?>
The important parts here are the fact that the post type is not public, and doesn't have an archive.
While this is a good start, it doesn't quite have all of the features we'll use. I recommend reading up on register_post_type() to learn about the types of options that are available. For instance, we also disable the title field and use page capabilities, not really necessary, but it cleans up the post edit screen a little.
Again, everything we're going to discuss you can do with little code snippets like this, and there are even some plugins that can help you create custom post types. We use our own plugin, WP Builder, because it has a simple UI for creating post types and adding some of these features with absolutely no additional code.
Custom Taxonomy
Now that we have our post type configured, we want a little more control over which social network a post will eventually be posted on. For this, we use a custom taxonomy. If you have never heard of a taxonomy, it's simply a way of classifying things. Categories and Tags are examples of taxonomies, and you can read more about Taxonomies as they relate to WordPress in the Codex.
What we want is a set of terms that correlate to each social network we are going to post to. This way, Facebook posts go only to Facebook, Twitter to Twitter, etc. As with anything, there are multiple ways to achieve this, but as we'll see later, using Taxonomies provides some additional benefit.
To create a custom taxonomy, you can add a snippet to your theme or in a plugin ( as stated, plugins are preferred ), or an existing plugin ( WP Builder in our case ).
<?php
function social_networks_init() {
     // create a new taxonomy
     register_taxonomy(
          'social_network',
          'social_media',
          array(
               'label' => __( 'Social Network' ),
               'rewrite' => array( 'slug' => 'social-network' ),
               'capabilities' => array(
               'assign_terms' => 'edit_social_network',
              'edit_terms' => 'publish_social_network'
               )
          )
     );
}
add_action( 'init', 'social_networks_init' );
?>
Like register_post_type(), register_taxonomy() has a plethora of options that you should read through.
Now we have a taxonomy, let's add a couple of terms ( or Social Networks ):
- Facebook ( slug = facebook )
- Twitter ( slug = twitter )
- Google Plus ( slug = gplus )
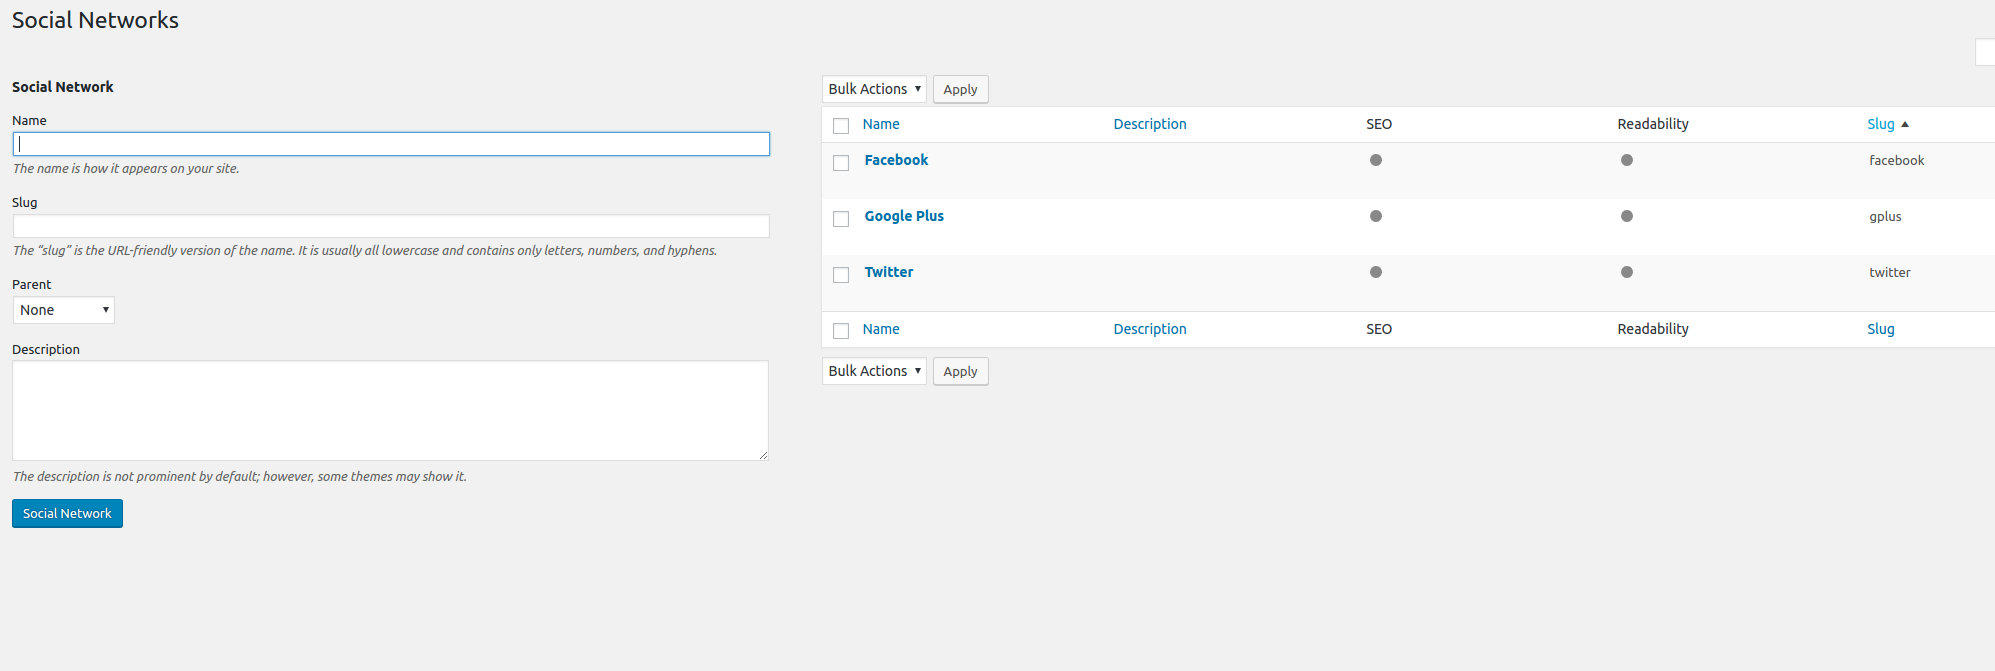
What you name your terms is ultimately not so important, they are just labels that we'll use to identify specific posts. If you have 3 Twitter accounts, you could name them "twitter_1", "twitter_2", "twitter_3", for instance. As long as you know which accounts each term represents, you are good.
Creating Social Media Content
Now we have a custom post type, Social Media, and custom taxonomy, Social Network, it's time to create some posts.
Depending on how you configured your post type, you should have a menu on you WordPress Dashboard navigation that looks a bit like this:
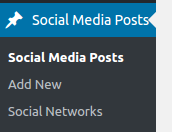
When you click "Add New", your screen might look like this ( note: this site has some other plugins for SEO ):
You might notice I have the Text tab active. The reason for this is because I do not want any HTML in my post content. Really, I should disable the editor to prevent any mistakes, but I will show you how I handle this later.
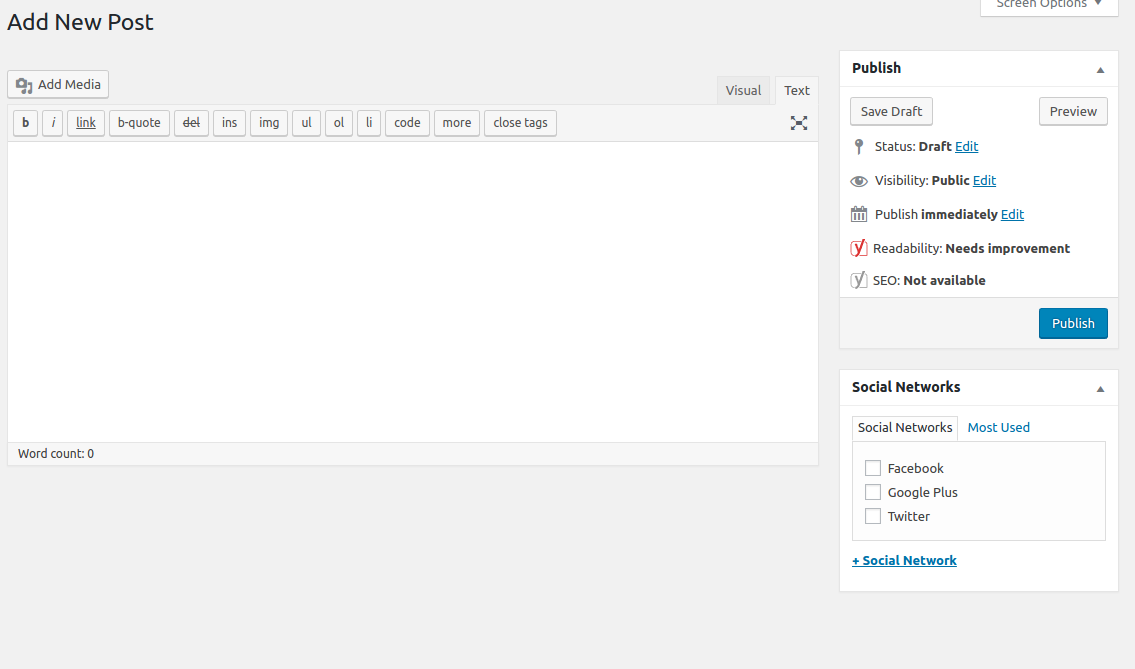
After you create your post, you can set it to Draft, adjust the post date, whatever your workflow calls for. But you will notice a side effect when you return to the Social Media page.
WordPress requires a title for every post. If you ask me ( and no one has ), this is a stupid design feature, I should be able to create whatever structure for content that I please. However, the good folks who built WordPress probably never envisioned this particular use-case, so there it is. Every post gets a default title, "Auto Draft". If this really bothers you, there are a couple of options:
- Enable the "Title" field on your custom post type ( just keep in mind, we won't be using it in our feed )
- Use a post_save hook to automatically write in a title that you like better.
- Something awesome I haven't thought of yet.
Personally, I think this screen is fine if I educate my customer about how to use it. Click Auto Draft to view the content, publish when ready. Easy stuff.
Accessing the RSS Feeds
A cool feature of WordPress is it's powerful RSS capability. The default feed just contains posts, which is great, but other post types are accessible through some nifty URL parameters.
We can access our published Social Media posts at something like:
http://example.com/feed/?post_type=social_media
This will show every published social media post on our site. Which is nice, but not quite what we need. What we want is a separate feed for each social network. And WordPress makes this easy as well.
This is where creating a custom taxonomy really pays off. By adding the parameter "taxonomy=social_network", we are telling WordPress that we want to filter the feed using our custom taxonomy, Social Network. Then we add the slug for each social network, in this case, generating 3 separate feeds.
- http://example.com/feed/?post_type=social_media&taxonomy=social_network&social_network=twitter
- http://example.com/feed/?post_type=social_media&taxonomy=social_network&social_network=facebook
- http://example.com/feed/?post_type=social_media&taxonomy=social_network&social_network=gplus
So, what does this look like?
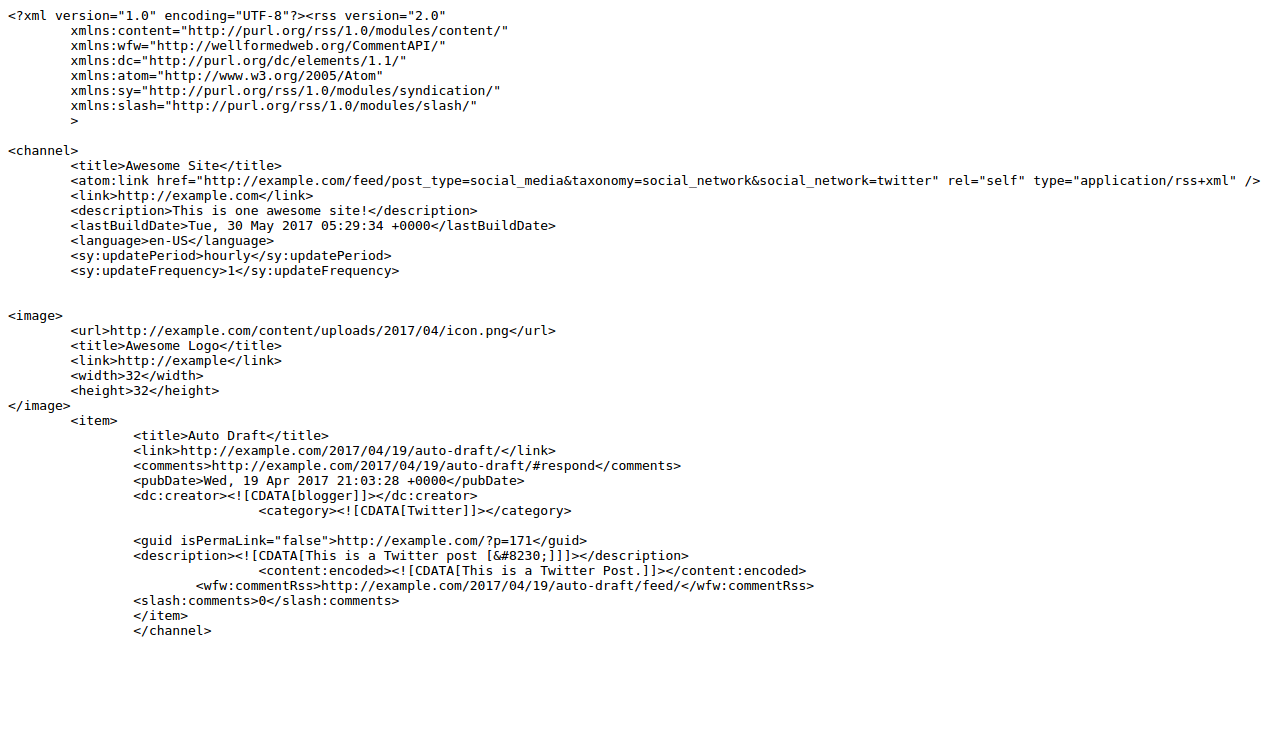
That is a lot of code!
We are now able to access just the posts for the specific social network we want!
Altering the WordPress Feed
However, we have a problem, Hootsuite doesn't use the <description> or <content:encoded>, which is where the content of our social media posts live. Instead, it uses only the title and date fields. This bites, because now we have to alter the feed to show our content in the title. Otherwise, every social media post will just have Auto Draft! Pretty terrible.
Fortunately, altering the Feed template isn't the most challenging of tasks. But it's a bit tedious, so bare with me. There are 3 steps to make the feed output in such a way that Hootsuite will post what we want.
- Create a new Feed template.
- Alter the content so it will validate, even if someone adds HTML to the post.
- Tell WordPress to use our new template for our Social Media posts only.
Create a new Feed template
The core of what we are going to do here is fairly straight forward, we're going to copy the WordPress template and make some changes. The core WordPress RSS2 template ( and we want RSS2 ) is located at /wp-includes/feed-rss2.php, copy it into your theme or plugin, something like /feed/feed-social_media_rss2.php.
This what you will have:
<?php
/**
 * RSS2 Feed Template for displaying RSS2 Posts feed.
 *
 * @package WordPress
 */

header('Content-Type: ' . feed_content_type('rss2') . '; charset=' . get_option('blog_charset'), true);
$more = 1;

echo '<?xml version="1.0" encoding="'.get_option('blog_charset').'"?'.'>';

/**
 * Fires between the xml and rss tags in a feed.
 *
 * @since 4.0.0
 *
 * @param string $context Type of feed. Possible values include 'rss2', 'rss2-comments',
 *                        'rdf', 'atom', and 'atom-comments'.
 */
do_action( 'rss_tag_pre', 'rss2' );
?>
<rss version="2.0"
    xmlns:content="http://purl.org/rss/1.0/modules/content/"
    xmlns:wfw="http://wellformedweb.org/CommentAPI/"
    xmlns:dc="http://purl.org/dc/elements/1.1/"
    xmlns:atom="http://www.w3.org/2005/Atom"
    xmlns:sy="http://purl.org/rss/1.0/modules/syndication/"
    xmlns:slash="http://purl.org/rss/1.0/modules/slash/"
    <?php
    /**
     * Fires at the end of the RSS root to add namespaces.
     *
     * @since 2.0.0
     */
    do_action( 'rss2_ns' );
    ?>
>

<channel>
    <title><?php wp_title_rss(); ?></title>
    <atom:link href="<?php self_link(); ?>" rel="self" type="application/rss+xml" />
    <link><?php bloginfo_rss('url') ?></link>
    <description><?php bloginfo_rss("description") ?></description>
    <lastBuildDate><?php
        $date = get_lastpostmodified( 'GMT' );
        echo $date ? mysql2date( 'D, d M Y H:i:s +0000', $date, false ) : date( 'D, d M Y H:i:s +0000' );
    ?></lastBuildDate>
    <language><?php bloginfo_rss( 'language' ); ?></language>
    <sy:updatePeriod><?php
        $duration = 'hourly';

        /**
         * Filters how often to update the RSS feed.
         *
         * @since 2.1.0
         *
         * @param string $duration The update period. Accepts 'hourly', 'daily', 'weekly', 'monthly',
         *                         'yearly'. Default 'hourly'.
         */
        echo apply_filters( 'rss_update_period', $duration );
    ?></sy:updatePeriod>
    <sy:updateFrequency><?php
        $frequency = '1';

        /**
         * Filters the RSS update frequency.
         *
         * @since 2.1.0
         *
         * @param string $frequency An integer passed as a string representing the frequency
         *                          of RSS updates within the update period. Default '1'.
         */
        echo apply_filters( 'rss_update_frequency', $frequency );
    ?></sy:updateFrequency>
    <?php
    /**
     * Fires at the end of the RSS2 Feed Header.
     *
     * @since 2.0.0
     */
    do_action( 'rss2_head');

    while( have_posts()) : the_post();
    ?>
    <item>
        <title><?php the_title_rss() ?></title>
        <link><?php the_permalink_rss() ?></link>
<?php if ( get_comments_number() || comments_open() ) : ?>
        <comments><?php comments_link_feed(); ?></comments>
<?php endif; ?>
        <pubDate><?php echo mysql2date('D, d M Y H:i:s +0000', get_post_time('Y-m-d H:i:s', true), false); ?></pubDate>
        <dc:creator><![CDATA[<?php the_author() ?>]]></dc:creator>
        <?php the_category_rss('rss2') ?>

        <guid isPermaLink="false"><?php the_guid(); ?></guid>
<?php if (get_option('rss_use_excerpt')) : ?>
        <description><![CDATA[<?php the_excerpt_rss(); ?>]]></description>
<?php else : ?>
        <description><![CDATA[<?php the_excerpt_rss(); ?>]]></description>
    <?php $content = get_the_content_feed('rss2'); ?>
    <?php if ( strlen( $content ) > 0 ) : ?>
        <content:encoded><![CDATA[<?php echo $content; ?>]]></content:encoded>
    <?php else : ?>
        <content:encoded><![CDATA[<?php the_excerpt_rss(); ?>]]></content:encoded>
    <?php endif; ?>
<?php endif; ?>
<?php if ( get_comments_number() || comments_open() ) : ?>
        <wfw:commentRss><?php echo esc_url( get_post_comments_feed_link(null, 'rss2') ); ?></wfw:commentRss>
        <slash:comments><?php echo get_comments_number(); ?></slash:comments>
<?php endif; ?>
<?php rss_enclosure(); ?>
    <?php
    /**
     * Fires at the end of each RSS2 feed item.
     *
     * @since 2.0.0
     */
    do_action( 'rss2_item' );
    ?>
    </item>
    <?php endwhile; ?>
</channel>
</rss>
?>
The parts we care about are in the <item> tag. What we want is to change <title> from <?php the_title_rss() ?> to <?php echo $content; ?>. To do this, we need to move <?php $content = get_the_content_feed('rss2'); ?> above the <title> tag.
Another annoying thing that Hootsuite does that is automatically include the <link> tag. WordPress populates this tag with a link to the original post, which is exactly what we don't want. Unfortunately, without the link tag, Hootsuite will not accept your feed. We have a couple of options here.
- Hardcode a link, maybe point it at your customer's Website home page.
- Populate it dynamically.
Setting the link dynamically gives you ( or your customer ) the option of providing a custom link for each post. For populating it dynamically, you could use a custom field. To use custom fields, you need to ensure your post type has custom fields enabled. The plugin Advanced Custom Fields is another option. We, again, turn to our WP Builder plugin which makes adding metaboxes and fields very easy, but that is another post for another time. The point here is, you need a link, so ensure some link is included, and the link will be included in every post.
I have removed a few features from the feed, like links to the comments, which I don't need. Here is my final template:
<?php
/**
 * RSS2 Feed Template for displaying RSS2 Posts feed.
 *
 * @package WordPress
 */

header('Content-Type: ' . feed_content_type('rss2') . '; charset=' . get_option('blog_charset'), true);
$more = 1;
echo '<?xml version="1.0" encoding="'.get_option('blog_charset').'"?'.'>';

/**
 * Fires between the xml and rss tags in a feed.
 *
 * @since 4.0.0
 *
 * @param string $context Type of feed. Possible values include 'rss2', 'rss2-comments',
 *                        'rdf', 'atom', and 'atom-comments'.
 */
do_action( 'rss_tag_pre', 'rss2' );
?>
<rss version="2.0"
    xmlns:content="http://purl.org/rss/1.0/modules/content/"
    xmlns:wfw="http://wellformedweb.org/CommentAPI/"
    xmlns:dc="http://purl.org/dc/elements/1.1/"
    xmlns:atom="http://www.w3.org/2005/Atom"
    xmlns:sy="http://purl.org/rss/1.0/modules/syndication/"
    xmlns:slash="http://purl.org/rss/1.0/modules/slash/"
    <?php
    /**
     * Fires at the end of the RSS root to add namespaces.
     *
     * @since 2.0.0
     */
    do_action( 'rss2_ns' );
    ?>
>

<channel>
    <title><?php wp_title_rss(); ?></title>
    <atom:link href="<?php self_link(); ?>" rel="self" type="application/rss+xml" />
    <link><?php bloginfo_rss('url') ?></link>
    <description><?php bloginfo_rss("description") ?></description>
    <lastBuildDate><?php
        $date = get_lastpostmodified( 'GMT' );
        echo $date ? mysql2date( 'D, d M Y H:i:s +0000', $date, false ) : date( 'D, d M Y H:i:s +0000' );
    ?></lastBuildDate>
    <language><?php bloginfo_rss( 'language' ); ?></language>
    <sy:updatePeriod><?php
        $duration = 'hourly';

        /**
         * Filters how often to update the RSS feed.
         *
         * @since 2.1.0
         *
         * @param string $duration The update period. Accepts 'hourly', 'daily', 'weekly', 'monthly',
         *                         'yearly'. Default 'hourly'.
         */
        echo apply_filters( 'rss_update_period', $duration );
    ?></sy:updatePeriod>
    <sy:updateFrequency><?php
        $frequency = '1';

        /**
         * Filters the RSS update frequency.
         *
         * @since 2.1.0
         *
         * @param string $frequency An integer passed as a string representing the frequency
         *                          of RSS updates within the update period. Default '1'.
         */
        echo apply_filters( 'rss_update_frequency', $frequency );
    ?></sy:updateFrequency>
    <?php
    /**
     * Fires at the end of the RSS2 Feed Header.
     *
     * @since 2.0.0
     */
    do_action( 'rss2_head');

    while( have_posts()) : the_post();
    ?>
    <item>
    <?php $content = get_the_content_feed('rss2'); ?>
      <title><?php echo example_alter_content_feed( $content ); ?></title>
      <link><?php echo get_post_meta( get_the_ID(), '_wp_builder_social_media_post_settings_link', true ); ?></link>
        <pubDate><?php echo mysql2date('D, d M Y H:i:s +0000', get_post_time('Y-m-d H:i:s', true), false); ?></pubDate>
        <?php the_category_rss('rss2') ?>
    <guid isPermaLink="false"><?php the_guid(); ?></guid>

<?php if (get_option('rss_use_excerpt')) : ?>
        <description><![CDATA[<?php the_excerpt_rss(); ?>]]></description>
<?php else : ?>
        <description><![CDATA[<?php the_excerpt_rss(); ?>]]></description>
    <?php if ( strlen( $content ) > 0 ) : ?>
        <content:encoded><![CDATA[<?php echo $content; ?>]]></content:encoded>
    <?php else : ?>
        <content:encoded><![CDATA[<?php the_excerpt_rss(); ?>]]></content:encoded>
    <?php endif; ?>
<?php endif; ?>
<?php rss_enclosure(); ?>
    <?php
    /**
     * Fires at the end of each RSS2 feed item.
     *
     * @since 2.0.0
     */
    do_action( 'rss2_item' );
    ?>
    </item>
    <?php endwhile; ?>
</channel>
</rss>
?>
Two funky things here:
- how my <link> tag is populated, which is how to access fields from our WP Builder plugin.
- a wrapper function example_alter_content_feed(), which I use to alter the content.
Also, a good idea when you are customizing your RSS template, use the W3C RSS validator.
Alter the Feed Content
If you recall, our post edit screen in WordPress had the WYSIWYG editor, and even though I switched to Text, you can still get HTML tags in the content. If you have HTML in your Title tag, it will not validate. Also, social networks will convert any HTML to entities, making the tags visible in the posts, which is not cool.
What we want to do is strip any HTML from our content. For that I created the wrapper function example_alter_content_feed(). I only call this function in the new custom template so it won't affect other RSS feeds on the site.
<?php
function example_alter_content_feed( $content ) {

  $content = strip_tags( $content );

  return $content;

}
?>
Very simple? You could do more with it, like include a Twitter handle or some custom text that you want to appear in each post. Bottom line, this fixes problems with how Hootsuite handles your RSS feed.
Tell WordPress to use the Template
This is pretty simple, in your plugin or theme, add this bit of code ( taken from WordPress Codex )
<?php
remove_all_actions( 'do_feed_rss2' );

add_action( 'do_feed_rss2', 'social_media_feed_rss2' );

function social_media_feed_rss2( $for_comments ) {

  $rss_template = get_template_directory() . 'feed/feed-social_media-rss2.php';

  if ( get_query_var( 'post_type' ) == 'social_media' and file_exists( $rss_template ) )

    load_template( $rss_template );

  else

    do_feed_rss2( $for_comments );

}
?>
All this does is check for whether we're trying to get the Social Media RSS feed, and loading our custom template.
You should now test the three RSS feeds, make sure they are loading the proper templates, make sure they validate.
Add Your Feeds to Hootsuite
Now you are ready to add the feeds to Hootsuite. This is pretty simple, and there are lot's of guides directly from Hootsuite. The important part is to make sure you assign the proper feed to the corresponding network. You can also custom text to the feed through Hootsuite, but it is very basic. I think it's easier to control on your end in WordPress.
Conclusion
RSS is a really powerful, and in my opinion, often overlooked resource. We looked at just one way using RSS can make our lives just a bit easier. We took the humble RSS feed and turned it into a super-charged social media workflow manager.
As a marketer, understanding the tools at your disposal and making them work for your clients is a critical part of the trade. WordPress gives you a lot, if you know how to customize it. Rather than burden your customers with yet another tool, better leverage the tools you have.